Like many folks, I've had problems with wood splitting on me when I drive a nail or screw into it. The basic solution is to go as thin as possible with the fastener, but there are a few other techniques as well.
It pays to understand the reason the wood has split in the first place; namely that the nail is displacing the wood fiber and this acts like a wedge to seperate the wood along the grain.
Next, is the wood old? Most wood hardens after it has has a chance to
season. This is why wood just brought home from the lumber yard is
easier to nail into than wood that has been in storage for awhile. The
hard wood is also easier to split than new wood. Greyed and weather
beaten wood also has a greater tendency to split when nailed or screwed
into.
First, try using a box nail or a brad. The thinner nail displaces less of the wood mass which is the source of the split.
Second, if the nail must be a normal sized one for strength, then the thickness of the wood may be too thin for the needed strength.
Third, drive the nail in farther away from the edge of the wood. I go with at least 3/4 of an inch from the end grain edge and an inch or more from the side grain edge. Driving the nail or screw at a gentle angle allows for nailing at a greater distance form the end grain edge as well.
Fourth, blunt the nail point. The blunted point forces some of the fibers of the wood down into the wood along with the nail instead of pushing them aside. This takes a stronger blow or larger hammer to do the job, so be prepared for the extra resistance.
Fifth, drill a pilot hole. I usually select a bit that is no more than 3/4ths of the size of the nail shank so the nail will still grip the wood. For screws, the bit I choose will be slightly smaller than the shank core of the screw. This is the portion of the screw from the area of the threads that doesn't include the threads. It is unnecessary to use a bit that will penetrate as far as the fastener unless the sizes are becoming quite large compared to the thickness of the wood. For common 2 by lumber I would always drill a pilot hole for anything 1/4 inch or more, and use a bit that penetrates as far as the fastener when the shank is 3/8ths or more.
Friday, January 17, 2014
Monday, January 13, 2014
A Great Shop Grinder
I was out in Utah visiting a buddy when on one of our scrounging adventures I discovered a Baldor 12 inch grinder for sale. This thing is a brute, but it is also pretty beat up looking from sitting outside. I paid the man 75 Bucks for the opportunity to take a possible pile of scrap home to play with.
Well, I should have known I was chewing on a mouthful when it was decided the grinder and pallet had to be loaded into my truck with a forklift. This made Ruby squat a bit and caused me to wonder how I was going to get this thing out of the truck.
Well, I have no pictures of how rough she looked, but we got it back to my buddy's house, took it apart to get it out of the truck, then proceeded to spend the better part of a week scrounging parts, sandblasting, knocking off grinding concretion, and painting.
About 115 Dollars later and we get it working! Most of the refurbishing cost was in replacing the safety visors, but I also replaced every nut, bolt, and washer possible with stainless steel and bought two rattle cans of paint along the way.
 Here it is in the background. This grinder is the largest Baldor grinder that is single phase; meaning it is also the largest grinder likely to be found in a home garage. For a total investment of $190, I now have a refurbished grinder that would cost about $1500 new. The only thing I should replace is the magnetic starter, and then only because the on/off buttons are beat up looking
There is no doubt that a grinder is a requirement in any garage. I just think there's a little Tool Time in all of us so there's nothing at all wrong with overkill.
This is what scrounging is all about. Find something cheap, refurbish it myself, have something nice for far less than it would normally cost to obtain it. Use the leftover garage budget money to find something else to play with.
Well, I should have known I was chewing on a mouthful when it was decided the grinder and pallet had to be loaded into my truck with a forklift. This made Ruby squat a bit and caused me to wonder how I was going to get this thing out of the truck.
Well, I have no pictures of how rough she looked, but we got it back to my buddy's house, took it apart to get it out of the truck, then proceeded to spend the better part of a week scrounging parts, sandblasting, knocking off grinding concretion, and painting.
About 115 Dollars later and we get it working! Most of the refurbishing cost was in replacing the safety visors, but I also replaced every nut, bolt, and washer possible with stainless steel and bought two rattle cans of paint along the way.
There is no doubt that a grinder is a requirement in any garage. I just think there's a little Tool Time in all of us so there's nothing at all wrong with overkill.
This is what scrounging is all about. Find something cheap, refurbish it myself, have something nice for far less than it would normally cost to obtain it. Use the leftover garage budget money to find something else to play with.
Spooled Cordage Dispenser
I have a spool of 550 cord that I found at a garage sale years ago. I've had it turn into a rats nest far more than once, so I naturally wanted a solution that puts the cord where I will find it and eliminate rats nests for good.
I hit on the idea of making a dispenser modeled after a paper towel dispenser.
 I scrounged around and picked up the 2x4 wood, a piece of pipe, and screws from around the shop. I routed out the slots for the pipe, screwed it all together and painted it red.
 I then hung it under the twine bobbin I'd already made and hung on the wall. Pretty simple project.
I hit on the idea of making a dispenser modeled after a paper towel dispenser.
Decorating the Garage
Decorating the garage is purely a matter of taste and interests. For myself, I have the license plates taken off of vehicles I've owned. I also have a few vanity signs that I've received as gifts over the years. Others may like to hang antique implements, old skis or any of a variety of old sporting equipment like golf clubs, tennis rackets, baseball bats, and what not.
The general idea though is to decorate the garage using things that reflect interests and tastes using items already on hand or easily found for cheap. If nothing else it can be a conversation starter when visitors come into the garage.

 Both pictures show what basic garage decorating entails. In my case I had the plates and the vanity signs; it was simply a matter of nailing them up where I wanted them.
The general idea though is to decorate the garage using things that reflect interests and tastes using items already on hand or easily found for cheap. If nothing else it can be a conversation starter when visitors come into the garage.
A Wall Clock Helps Keep the TIme Organized
I suggest a wall clock that's easy to read from anywhere in the garage. Having a clock is a great way to time a task or project or to have some means of knowing when to knock off for the day.
I already had a wall clock hanging around in the house so it got pressed into service in the garage.
 I placed it near the door as this was the one place where it could be seen throughout the shop. The lone exception is when I'm sitting at the project workbench, but all I need do is stand up to see the time.
Repurposing the clock cost me a double A battery. It also illustrates the results of beginning scrounging, which is to find stuff I already have that can be used for the need at hand.
I already had a wall clock hanging around in the house so it got pressed into service in the garage.
Repurposing the clock cost me a double A battery. It also illustrates the results of beginning scrounging, which is to find stuff I already have that can be used for the need at hand.
Pegboard's Importance in Organizing the Garage
While buying pegboard usually represents actual cost in setting up a garage, it never hurts to keep an eye out for it when out on scrounging adventures. It pays to know what a sheet retails for in order to avoid paying too much from someone that thinks their stuff is made of gold. The basic pegboard starts at about Nine Bucks for a 4x8 sheet and it goes all the way up to Forty-Five bucks for a hardwood sheet the same size.
 I bought two sheets six or seven years back and hung them in a traditional manner with vertical furring strips mounted at the wall studs to provide space behind the pegboard to mount the hooks. This was necessary due to the finished walls in the garage.
 I'm fortunate that I had room for two sheets. Anyway, the furring strips aren't necessary if the garage has bare stud walls.
 I also cut and mounted a partial sheet to the back of my project workbench.
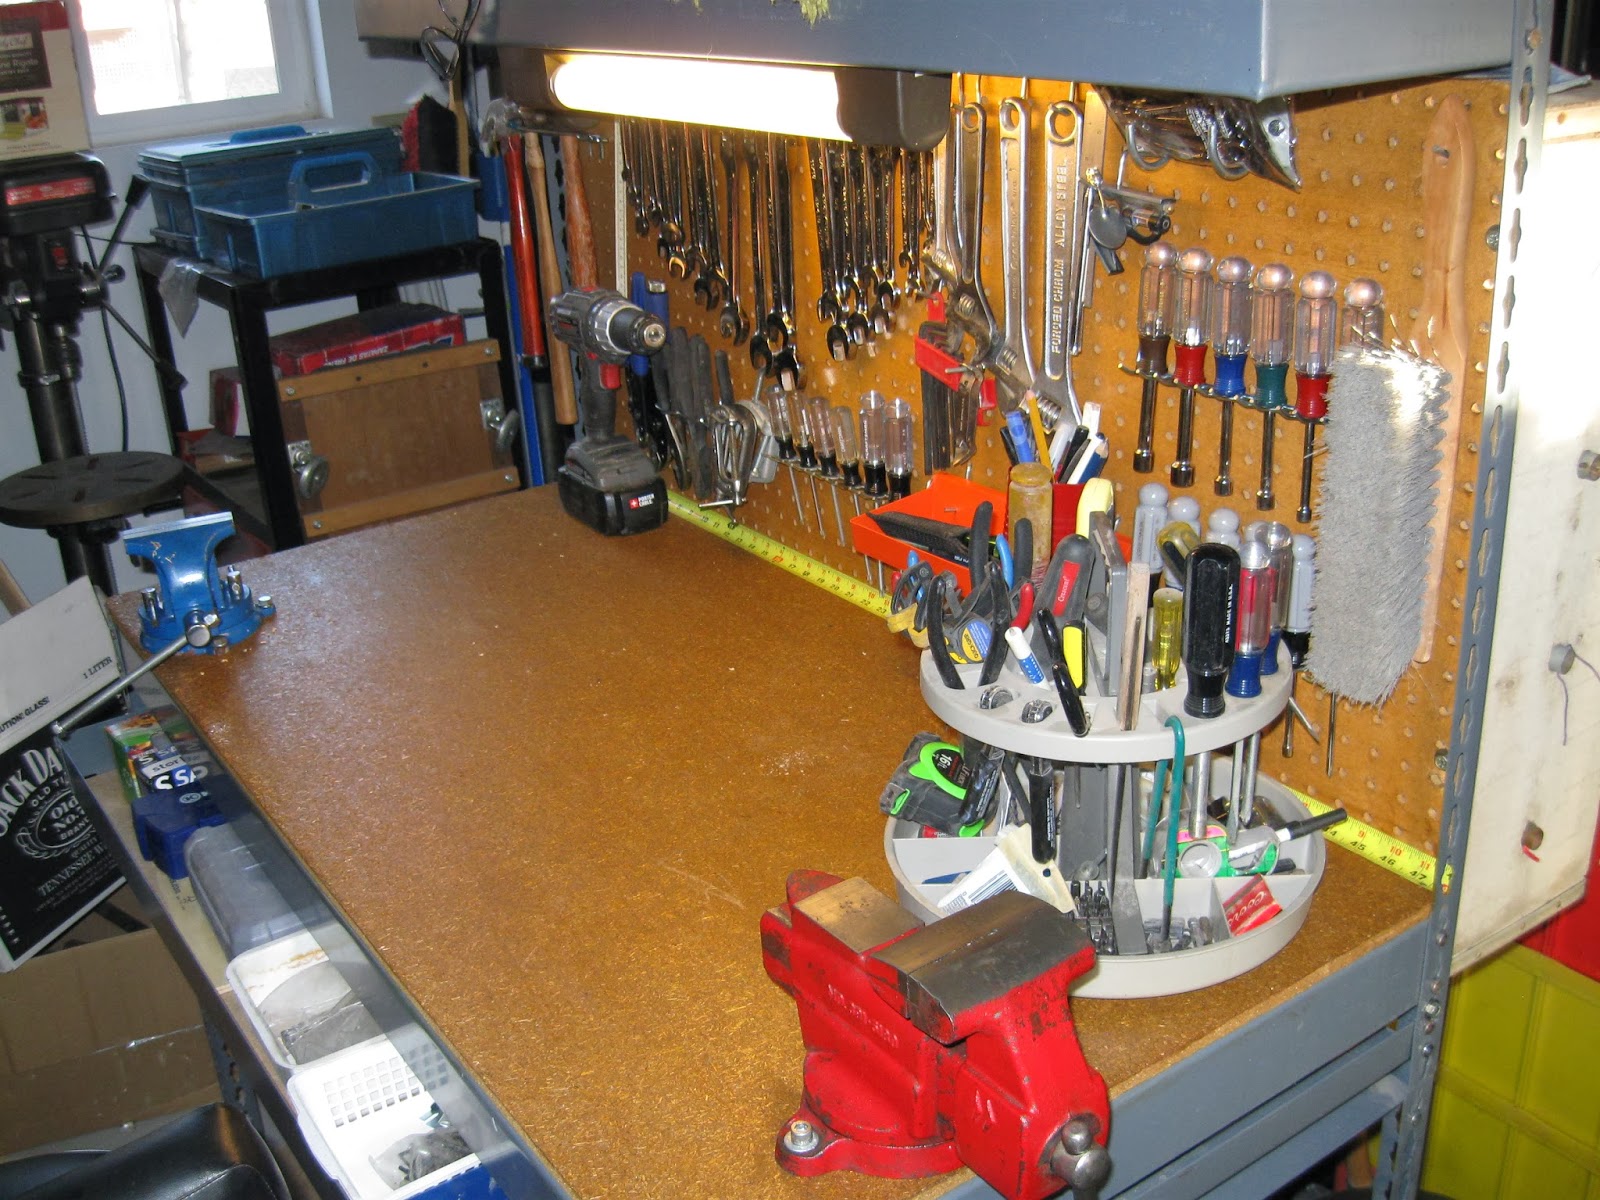 This gave me the opportunity to hang my most used tools right where I'm likely to use them.
Pegboard is important to organizing the garage in a creative manner. While scrounging it is an option not to be overlooked, it doesn't turn up that often. Pegboard also rarely turns up at garage sales because once mounted, people almost never take it down. The only scrounging likely to help reduce the cost is to acquire the screws, washers, furring strips and nails.
Pegboard is important to organizing the garage in a creative manner. While scrounging it is an option not to be overlooked, it doesn't turn up that often. Pegboard also rarely turns up at garage sales because once mounted, people almost never take it down. The only scrounging likely to help reduce the cost is to acquire the screws, washers, furring strips and nails.
Akro-Bins in the Garage
Never overlook the possibility of finding great storage bins at a sale of some sort. In this case I'm referring to Akro-Bins, which come in a variety of shapes and sizes.
 Here's two varieties in one. The upper bin organizer is plastic and from the mid Eighties. The lower one is made of metal and probably from the early Eighties or before.
 It never hurts to take a picture of the bin part number in case you have missing bins and want to try tracking down replacements.
 This is another type of Akro-Bin. These are larger and are stackable.
 In this case I placed some of them under the workbench in the picture while the rest are to the left.
The early plastic organizer I bought new years ago. The rest are garage sale finds.
The early plastic organizer I bought new years ago. The rest are garage sale finds.
Wire Spool Box from an Old Wooden Crate
I actually found this wooden wire spool box at a garage sale for the princely sum of a Buck. The wire spools that were already in it have hand written dates form the mid to late Sixties. How cool is that?
 One could be made from plywood, screws, some metal strips, pipe, and rubber grommets. I modified the cabinet by cutting some of the holes larger and installing larger grommets to accommodate the 12 and 10 gauge automotive wire seen on the third pipe down. Other than that it got a fresh paint job when I hung it where it sits now.
I really like it as it organizes most of my spooled wire and provides a handy dispenser all in one box.
A Buck! The only way to beat that is to break out the scrounge-O-meter!
I really like it as it organizes most of my spooled wire and provides a handy dispenser all in one box.
A Buck! The only way to beat that is to break out the scrounge-O-meter!
A First Aid Kit is Important
It's very important to have a first aid kit in the garage. I have two in fact, as the one on the wall doesn't have any gauze pads in it. I found this to be very strange, but then I got it for a Dollar or something at a garage sale.
 I hung the kit by the door so it's easy to find. The second one sits in the window sill next to the fire extinguisher. I should update the photo to include the second one.
When I have friends over helping me I make sure they know where both it and the fire extinguisher are in case they are needed.
When I have friends over helping me I make sure they know where both it and the fire extinguisher are in case they are needed.
A Rubber Sanding Block and Scotchbrite To Cleanup Flat Bare Metal
I have a number of pieces of equipment in the shop that have flat bare metal surfaces. In order to keep them in top shape I scrub off the rust I may find and rewax them on a regular basis.
In order to clean the flat surfaces effectively, I use a rubber sanding block over a piece of Scotchbrite to remove rust and stuck on stuff like paint or adhesives.
 Here I'm using red Scotchbrite on my table saw, but I think green would work too.
 The rubber sanding block gets good pressure on the surface and works the surface evenly. I suggest rubbing only as hard as necessary to remove whatever is offending the sensibilities.
As soon as I am done I rub down the worked area with Turtlewax, let it dry and buff off the excess residue. This routine keeps the bare metal surfaces bright and shiny, plus allows work to slide across the surface much easier.
In order to clean the flat surfaces effectively, I use a rubber sanding block over a piece of Scotchbrite to remove rust and stuck on stuff like paint or adhesives.
As soon as I am done I rub down the worked area with Turtlewax, let it dry and buff off the excess residue. This routine keeps the bare metal surfaces bright and shiny, plus allows work to slide across the surface much easier.
Sawdust as Oil Dry
I use my garage for more uses than storing motorcycles and tinkering with contraptions. I also do a small amount of woodworking, mostly of the carpentry sort. The table saw is the most significant item that produces dust, so I have a dust collector attached to it to keep the garage a little cleaner.
Well the dust collector has a pretty large collection bag, and whenever I have an oil spill (actually an oil drip spot from one of my Harley's) then I use the saw dust to dry up the spill and remove it.

I think it works as well as Kitty Litter, but I'm not planning on doing a comparison test either. It works for me and doesn't cost a thing, so it's all good.
Well the dust collector has a pretty large collection bag, and whenever I have an oil spill (actually an oil drip spot from one of my Harley's) then I use the saw dust to dry up the spill and remove it.
I think it works as well as Kitty Litter, but I'm not planning on doing a comparison test either. It works for me and doesn't cost a thing, so it's all good.
Mouse Trap as a Glove Holder/Hanger
I spotted the idea of using a mousetrap as a glove holder on another site and decided to give it a try.
 I only had to drill a hole in it and it works like a charm! When I need the gloves all it takes is a tug and out they come, ready to use.
Small Charcoal Grill as an Incinerator
I picked up a Weber Smokey Joe grill on one of my scrounging trips and at first didn't have a real use for it as I have a nice propane grill already.
Then I discovered its utility as an incinerator.
 In this case I'm burning some scrap wood to get rid of it and have a bit of warmth on a sunny winter day.
 I can also burn papers I don't want to go in the trash, cardboard, and like items. Afterward, I can spread the ash on my compost heap or in my flower beds to improve the mineral content in them.
Check your local ordinances, but I doubt anyone would ever get hassled for burning small amounts of burnable waste in a charcoal grill. I do admit this would probably not work in an apartment complex, but then your chances of having a garage are lower as well.
Then I discovered its utility as an incinerator.
Check your local ordinances, but I doubt anyone would ever get hassled for burning small amounts of burnable waste in a charcoal grill. I do admit this would probably not work in an apartment complex, but then your chances of having a garage are lower as well.
Hang that Tool on the Pegboard using a Length of Cord
I needed to hang one of my tire irons on the garage pegboard and in looking at it I decided I didn't want to drill a hole in it. Instead I tied a length of cord into a loop and then secured the loop of cord to the tire iron to hang it with.
 If the cord won't stay on the tool, then the cord can be tied differently. This rig seems to be working, so I'll stick with it for now.
Use a Silverware Caddy as a Tool Holder
I thought this idea up years ago and I've used it ever since. I found a silverware caddy I liked and now I use it to hold tools I'm using during a project. It keeps them nice and tidy as long as the tool pile isn't overly huge.
 They can be found at garage sales, thrift stores, or at the discount store. You could even purloin the one in the kitchen if you can get away with it.
Buy Supplies in Bulk Containers when Practical
I ran out of window cleaning fluid a few weeks ago and in looking at the spray bottle, I saw that it still had a lot of life left in it.
Rather than pitch the old container, I chose to buy the window washing fluid in the bulk container and refill the old container instead.
 For the same price (a Dollar) I got a little more than twice as much fluid as just buying the spray bottle. That is some savings I can believe in. Now I don't advocate buying stuff in barrel sizes, but when the amount is something that will be used in a reasonable period of time, then the bulk purchase makes good sense.
Rather than pitch the old container, I chose to buy the window washing fluid in the bulk container and refill the old container instead.
Small Lidded Vials Used for Small Parts Storage
I'm sure we've all seen small vials, and various lidded containers floating around in our lives and they do have a use in the garage for storage.
 This one is an example. The advantage of the clear ones are the usual being able to quickly identify the contents.
At any rate, free is the watchword when finding storage items for the garage.
At any rate, free is the watchword when finding storage items for the garage.
Ice Cube Tray used to Organize Small Parts During a Project
I've seen the use of an ice cube tray to organize small parts during a project in several places. All this means is it works pretty well.
 The only problem with the idea is the parts have to be pretty small in order for it to work. It beats just throwing the used up ice cube tray in the trash, so I'm on it!
Baby Food Jars for Storage
Yes, I think it's still possible to get baby food jars in glass containers. The ones I have are pretty old though.
They do have some advantages though. They are smaller than other glass jars, they have lids that reseal decently, and the clear glass makes identifying the contents of the jar pretty easy.
 The only real downside is the jar is made of glass making them easy to break if dropped or knocked off the workbench.
Still, they are a decent storage option for free.
They do have some advantages though. They are smaller than other glass jars, they have lids that reseal decently, and the clear glass makes identifying the contents of the jar pretty easy.
Still, they are a decent storage option for free.
Peanut Butter Jars for Storage
My sister is quite the peanut butter fanatic. I think she goes through two or three jars a month. Well, I decided to take a look at the jars as a possible storage container in the garage. I ran one through the dishwasher to remove the remaining peanut butter and proceeded to clean up the jar to my standards; namely no labels and no glue.

The peanut butter jars are pretty sturdy and have the decided advantage of being made of clear plastic. The plastic is unlikely to break if the jar is dropped, and being able to see the contents speeds up finding things. I also like that I can label the contents in sharpie. An added bonus, the tops can be color-coded to some extent if you are willing to plan out what the colors mean and be willing to buy different brands of peanut butter to take advantage of the different colored lids.
The peanut butter jars are pretty sturdy and have the decided advantage of being made of clear plastic. The plastic is unlikely to break if the jar is dropped, and being able to see the contents speeds up finding things. I also like that I can label the contents in sharpie. An added bonus, the tops can be color-coded to some extent if you are willing to plan out what the colors mean and be willing to buy different brands of peanut butter to take advantage of the different colored lids.
Plastice Coffee Cans for Storage
At first I lamented the change over of coffee cans from metal to plastic as a loss of a source for storing nuts and bolts.
I got to looking at a can that my sister threw in the trash and realized the plastic ones are at least as good as the metal cans were.
 In this case I've got two cans, the larger one has plastic imprinted labels, but the small one had a paper label which I removed along with the glue. The containers are reasonably sturdy, the lids appear to be superior to the old coffee can lids, and it's easy to write the contents on the can in sharpie.
So the venerable coffee can as storage idea still has legs!
I got to looking at a can that my sister threw in the trash and realized the plastic ones are at least as good as the metal cans were.
So the venerable coffee can as storage idea still has legs!
Drilling a Hole in a Tool to hang it on a Peg Board
I needed to place some bicycle tire spoons on the garage pegboard with the rest of my bicycle tools, but they didn't have any holes in them to do so.
Solution: Drill some holes in them!

 Here's the tool hanging from the pegboard.
It's important not to drill holes in a tool that might compromise the strength of the tool. Otherwise, modifying a tool to make it work better in your garage is always an option to think about.
Solution: Drill some holes in them!
So I drilled a hole in the tool in a location that would work and not compromise the strength of the tool.
It's important not to drill holes in a tool that might compromise the strength of the tool. Otherwise, modifying a tool to make it work better in your garage is always an option to think about.
Magnetic Benchtop Tool Holder made from a Speaker
I saw a novel use of a speaker magnet to make a benchtop tool holder and decided to give it a try.
I had some 1/4 threaded rod lying around along with a doughnut speaker magnet, a stripped down speaker housing, nuts and a few fender washers. After looking it over I decided I needed a couple of 5/16x1 1/4 fender washers to finish the project.
I cut about nine or ten inches of threaded rod, then used washers and nuts to clamp the base to the threaded rod followed by the magnet.
 The magnet is strong enough to hold a 6 inch crescent wrench, a Phillips screwdriver and a box cutter knife. I haven't weight tested it, but the idea is to have a magnet that is strong enough to hold a typical small tool without being so strong that I have to hold the stand to extract a tool from it. Of course a good trick to minimize a tip-over is to pull the tool down from the magnet before pulling it away.
I find this more of a conversation piece than something I would really use, but this could change over time so I'll let it occupy space on the bench for now. I suppose the thirty five cents it cost me to make something from raw materials makes it worth the effort.
I had some 1/4 threaded rod lying around along with a doughnut speaker magnet, a stripped down speaker housing, nuts and a few fender washers. After looking it over I decided I needed a couple of 5/16x1 1/4 fender washers to finish the project.
I cut about nine or ten inches of threaded rod, then used washers and nuts to clamp the base to the threaded rod followed by the magnet.
I find this more of a conversation piece than something I would really use, but this could change over time so I'll let it occupy space on the bench for now. I suppose the thirty five cents it cost me to make something from raw materials makes it worth the effort.
Zip Lock Bag Storage Ideas
Zip Lock bags can be used to store a variety of items and they have definite advantages over other forms of storage.
First, the clear plastic film makes identifying items in the bag a snap.
Second, the bag collapses down to just the bulk volume of whatever is in it which saves space.
Third, the contents can be written onto the bag in Sharpie further improving identification of the contents.
Fourth, buying them at Dollar Tree or your local discount store keeps the cost per bag down to just a few cents. Never buy the name brand bags as they are always twice as expensive and never more than just a little better quality.
Fifth, the ability to seal the bag tends to keep items in the bag.
Sixth, the ability to seal the bag can protect the contents from drying out (such as rolls of tape).
Seventh, the ability to seal the bag protects the contents from water and dirt.
Eighth, the accommodating nature of the bags makes it easier to organize parts in sub-assembly groups during dis-assembly of some contraption in need of work.
There are a few disadvantages as well.
One, the flimsy variety of the bags do not hold up to things like wads of nails or other sharp objects. Use freezer bags if durability is likely to be an issue.
Two, the bags are not very good at storing heavy objects without the possibility of tearing open.
Three, digging through a pile of bags looking for a specific something is still a pain in the butt.
At any rate, here's a photo of some of the common uses for Zip Lock bags.
 It may be a bit hard to see what is in the bags, so in front is a roll of masking tape, then a handful of staples. Next to the staples lies a bag of deck and wood screws, and in the back are some cubes of candle wax.
 Let's not forget the variety of sizes available as well. I keep the sandwich and snack sizes in the garage all the time, and swipe the quart and gallon size from the kitchen whenever I need the extra room.
The name of the game is to improve organization in the garage without cutting into the garage budget any more than absolutely necessary. Keeping a couple boxes of these does a fine job and the cost per box can be around a Buck.
First, the clear plastic film makes identifying items in the bag a snap.
Second, the bag collapses down to just the bulk volume of whatever is in it which saves space.
Third, the contents can be written onto the bag in Sharpie further improving identification of the contents.
Fourth, buying them at Dollar Tree or your local discount store keeps the cost per bag down to just a few cents. Never buy the name brand bags as they are always twice as expensive and never more than just a little better quality.
Fifth, the ability to seal the bag tends to keep items in the bag.
Sixth, the ability to seal the bag can protect the contents from drying out (such as rolls of tape).
Seventh, the ability to seal the bag protects the contents from water and dirt.
Eighth, the accommodating nature of the bags makes it easier to organize parts in sub-assembly groups during dis-assembly of some contraption in need of work.
There are a few disadvantages as well.
One, the flimsy variety of the bags do not hold up to things like wads of nails or other sharp objects. Use freezer bags if durability is likely to be an issue.
Two, the bags are not very good at storing heavy objects without the possibility of tearing open.
Three, digging through a pile of bags looking for a specific something is still a pain in the butt.
At any rate, here's a photo of some of the common uses for Zip Lock bags.
The name of the game is to improve organization in the garage without cutting into the garage budget any more than absolutely necessary. Keeping a couple boxes of these does a fine job and the cost per box can be around a Buck.
Wiring Outlets to the Workbench - Countertop Mount
I have yet another workbench that I have had trouble finding outlets near, so I decided to address the problem at this workbench as well.
This time I don't have an overhead shelf built inot the bench, so I decide I'll have to mount the outlets into the countertop.
I looked over the anticiapted parts list and then went about digging the parts I could use out of the repurposing bins and nut/bolt boxes. I found a cut heavy duty extension cord I could use, two outlets, electrical cable, some particle board screws, and electrical box wire clamps.
This reduced the buy list to two metal electrical boxes and I decided to buy the gray wet location outlet covers to keep dust out of the outlets. Total cost came to about Ten Bucks.
 After I came back from the store, I proceeded to mark the inside of the countertop so I knew where the workbench mounts to the countertop. I removed the countertop, marked where I wanted the outlet boxes mounted, cut the holes in the countertop so that the outlet boxes fit and were square on the benchtop, mounted the outlet boxes and ran the wire between the boxes. I fastened the wires down with the plastic wire protectors at 6 inch intervals like I did on the previous outlet project, and this completed the basic mounting.
 I then flipped the countertop back over and proceeded to wire the outlets.
 During fitting I discovered the wet location outlet covers didn't fit snugly to the countertop. Some snooping around revealed that there's a dimple on the backside of the cover preventing this. I deduced this is to account for the foam backing that I discarded as not needed for this project. I fixed the dimple problem by drilling out the hole in the plastic outlet so the dimple could sit down into the new hole. So long as I didn't drill out the metal behind the plastic I figured I would be fine. The second fitting proved my theory so it worked out as well as I hoped.


This project cost me Ten Bucks this time. I might have been able to reduce the cost a bit by checking out the ReStore used construction supplies store, but I'll make a mental note to look there first the next time I come up short on the parts list.
This time I don't have an overhead shelf built inot the bench, so I decide I'll have to mount the outlets into the countertop.
I looked over the anticiapted parts list and then went about digging the parts I could use out of the repurposing bins and nut/bolt boxes. I found a cut heavy duty extension cord I could use, two outlets, electrical cable, some particle board screws, and electrical box wire clamps.
This reduced the buy list to two metal electrical boxes and I decided to buy the gray wet location outlet covers to keep dust out of the outlets. Total cost came to about Ten Bucks.
Here's the finished job with the countertop reattached to the workbench.
Not shown: I had to also grind off a fair amount of metal tabs in the dust covers so I could get them to open up completely as pictured. I did this with the trusty bench grinder and a file to cleanup the areas I couldn't get to with the grinder. Otherwise I now have another workbench with power outlets.
Wiring outlets to the Workbench - Overhead
I got good and tired of hunting for outlets around my project workbench so I decided to take care of the problem.
I sat down and looked at the stuff I had on hand. Let's see: I had a nice piece of heavy duty electrical cord from a broken reciprocating saw, plenty of electrical cable, 2 outlets, particle board screws, some nuts, bolts and washers to mount the outlets with, and I swiped some cable protector plastic bits from come cable staples I had on hand. This left only the metal surface mount outlet boxes and metal covers. The whole buy list came to something like Six Bucks.
Here's the result:
 I mounted one outlet on the right side of the bench using nuts, bolts and washers.
 Then I did the same on the left side of the bench.
 I ran the electrical cable from one to the other on the underside of the particle board shelf using the plastic cable protectors and particle board screws. I fastened the cable as close to the outlet boxes as I could and then fastened the cable every 6 inches. This may be overkill, but I didn't want someone to decide the cable makes a great hanger of some sort. Better would have been a section of conduit between the outlet boxes, but this will do for now.
 I wired the salvaged electrical cord to the left side outlet and simply plugged it into a convenient outlet.
I then rerouted the cord for the light and plugged it in. The beauty of this design is that I can still take the workbench apart easily if I feel it's necessary.
 And here's an overview of the workbench with the new outlets. After accounting for the bench light I still have three outlets conveniently located right at the bench regardless of where I may move it to.
If I were to buy all of the bits to do this project the expense would have been quite a bit higher so I made out pretty well and it totally validates scrounging as a means of extending the garage budget. While this project depleted the garage budget a little, it was more than worth the effort and Six Dollar expense.
I sat down and looked at the stuff I had on hand. Let's see: I had a nice piece of heavy duty electrical cord from a broken reciprocating saw, plenty of electrical cable, 2 outlets, particle board screws, some nuts, bolts and washers to mount the outlets with, and I swiped some cable protector plastic bits from come cable staples I had on hand. This left only the metal surface mount outlet boxes and metal covers. The whole buy list came to something like Six Bucks.
Here's the result:
I then rerouted the cord for the light and plugged it in. The beauty of this design is that I can still take the workbench apart easily if I feel it's necessary.
If I were to buy all of the bits to do this project the expense would have been quite a bit higher so I made out pretty well and it totally validates scrounging as a means of extending the garage budget. While this project depleted the garage budget a little, it was more than worth the effort and Six Dollar expense.
Salvage Wax from an Old Jar Candle
It's well known that wax makes a great lubricant and rust protector,
but should I have to buy it by the stick in order to take advantage of
it?
Well, no.
This morning my sister threw a used up jar candle in the trash and it got me to thinking; can I salvage some wax out of the jar? What can I put it in to make it useful?
I dredged the candle jar out of the trash and, yes, there's wax still in the jar, even though the candle wick burned all the way down to the bottom. Great! Now the experiment's on!
 Here I've placed the candle jar in some hot water to melt the wax.
 Some scrounging later, and I came up with an ice cube tray to pour the melted wax into to cool.
 Wow! Eight and a half cubes?! I thought I might get 2 or 3. To speed up cooling, I placed the tray into the freezer for about 10-15 minutes. The wax was still just a little soft when I popped out the wax cubes and they popped out easily this way.
 And here's the new supply of wax blocks I can use to lube and protect equipment. They will be better protected from dust and dirt in the Ziplock bag. The ice cube tray was already cracked so it will head out to the garage for use in future projects as well.
Well, no.
This morning my sister threw a used up jar candle in the trash and it got me to thinking; can I salvage some wax out of the jar? What can I put it in to make it useful?
I dredged the candle jar out of the trash and, yes, there's wax still in the jar, even though the candle wick burned all the way down to the bottom. Great! Now the experiment's on!
Tuesday, January 7, 2014
Making Rulers from a Broken Tape Measure
I had most of a tape measure left over from making a bench top rule out of a broken tape measure and was thinking of a way to use the rest of the broken unit. I knew I would eventually be able to reuse the other parts, but what to do with the tape? I then remembered that I'd seen where someone cut up the tape from a broken metal tape measure to make one foot rulers. This sounded like a good use for something that no longer is serviceable so I decided to give it a try.
 I used a pair of tin snips to carefully cut the metal tape just to the low side of the index mark at each foot increment.
 I then compared the first inch to a steel ruler. This one looks good enough to use. The ones that were cut a tad long got touched to the grinder to size them properly. I found that recutting the tiny amount I was off just didn't work with snips.
 Here's the pile of cut rulers. I had one to discard from a previous project because the first inch was too short. Other than that I had 20 of them to check out. You can see where the first four feet of the tape went in the background.
 I then cut a hole in the high end so the rulers could be hung from a peg. I discovered afterward that drilling tends to cause tear outs in the thin metal. Better would have been to punch out the holes. I had one tear out that was bad enough to force me to discard the ruler rather than risk getting nicked on the metal shard by the hole. I was able to cleanup the rest reasonably well with a rat tail file.
 I then tried to use one to see how it works as a straightedge. I must say, the curved metal is easy to pick up and easy to use. Additionally, I found I could get a more precise line with the ultra thin metal than with a steel ruler as I easily drew a line right on top of a ruled line in my journal.
 I then began distributing the rulers around locations where I might need to take a quick measurement. I made a happy discovery when the ruler I placed in a can held with a magnet drew in the ruler to hold it fast in the can. No muss, no fuss; just drop it in the can and 'click' it sticks to the side of the can where the magnet is.
 Another location.
 And another convenient spot.
 And yet another convenient spot. I have about 15 left over as spares or waiting for a location to put one so I doubt there's any real need to do this more than once or twice in a lifetime. Why twice? Let's just presume that not everyone shares my enthusiasm for doing things on the cheap and instead has the motto: Things saved from the dumpster are only waiting to go back into the dumpster when Charlie's not looking.
Subscribe to:
Comments (Atom)